Bricklink Ordering Tutorial
This step by step tutorial will help you order parts (or just view part lists) from Bricklink.com automatically using my source files. Bricklink is the biggest marketplace to buy individual LEGO parts and its my preferred choice to get all the parts needed.
Why we need all this? – There are many many LEGO parts from different times and different sets in different shapes and colors. These parts are sold by individual sellers all across the world. It would be really inconvenient to search every part one by one. So we have this Bricklink system where I can export my design as Bricklink source file, and this file when uploaded on Bricklink will automatically find all the parts needed.
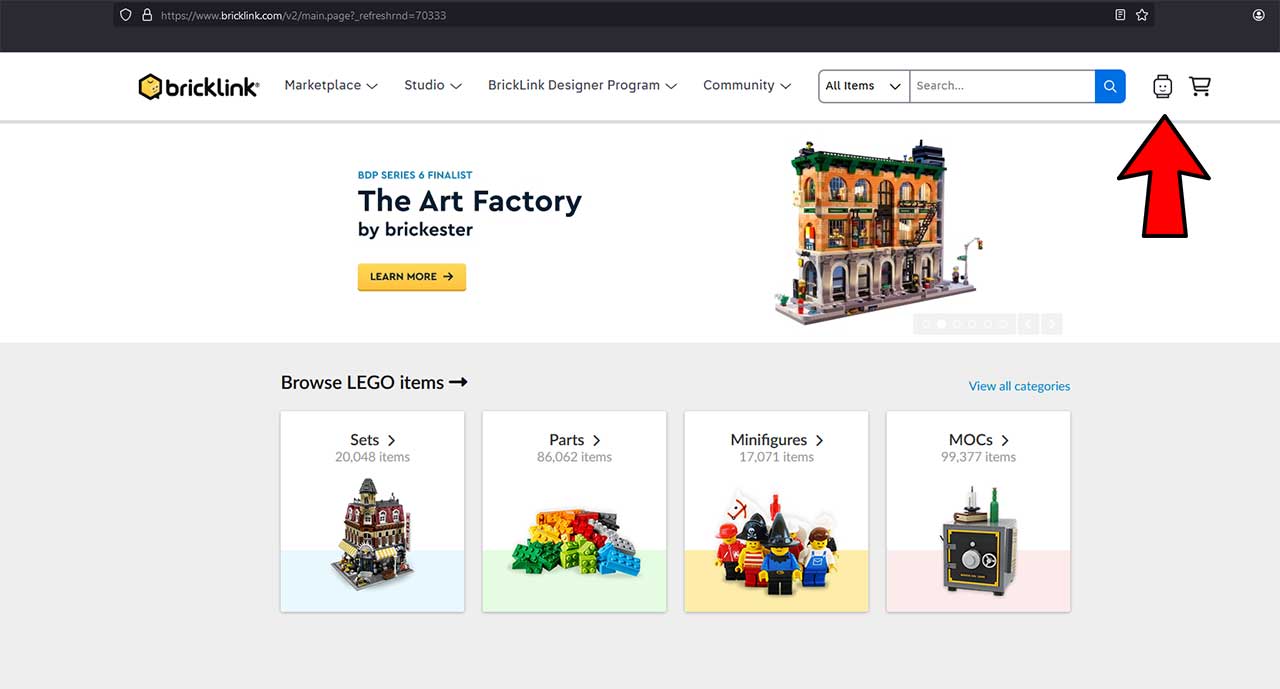
Step 1
– Register to Bricklink.com
To do that click on that minifigure icon where my red arrow points. Once clicked you will have choice to ”Sign-In” or to ”Create Account”
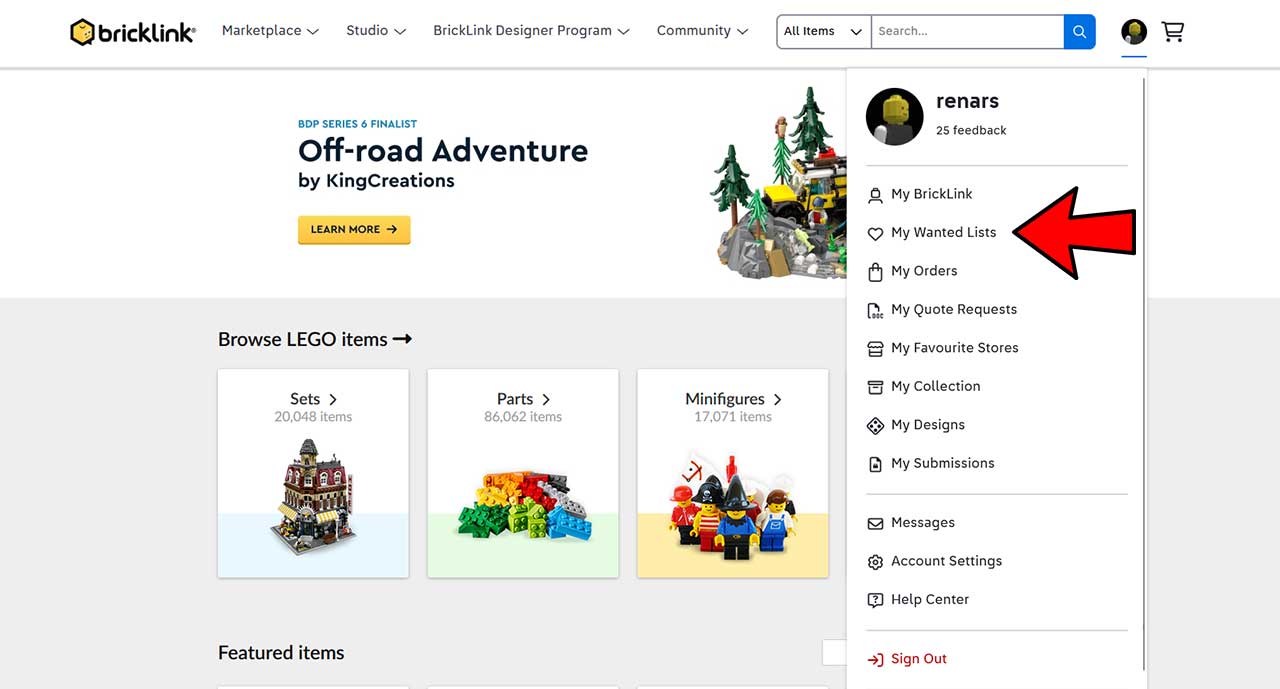
Step 2
– Once you have your account and are are logged-in click on that icon again, and it will reveal several options. What you want is to have list of LEGO parts you need to buy. To do that click on section – ”My Wanted Lists”
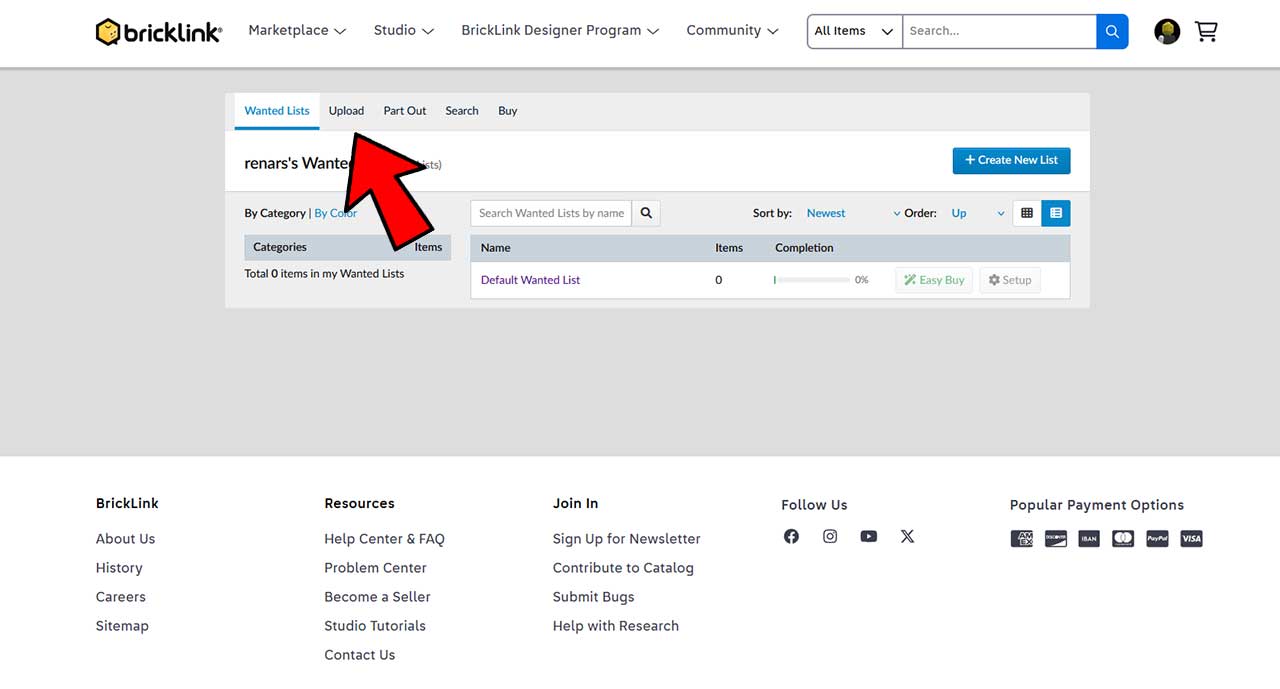
Step 3
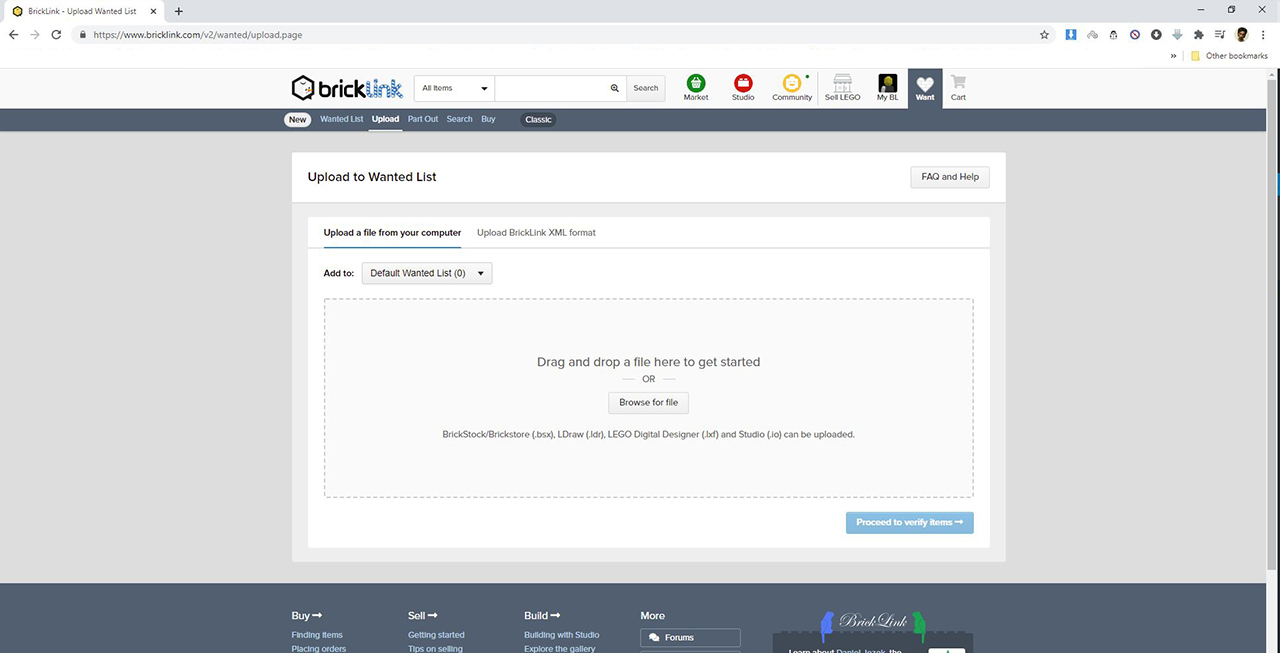
– In next screen we see that we have ”Default Wanted List” already (with 0 items). You can add all our parts in that. To do that click on ”Upload” section
Step 4
– Now we need to find my Bricklink source file. This will be file with .io extension. File name will include words ‘‘Source” or ”Bricklink Source”. This file won’t do anything by itself, you won’t be able to open it (unless you have tools that can open and edit this format files). But you don’t need to open it, just locate this file, so you can upload it on site.
– Phones won’t recognize this file, so you need to use computer! On mobile devices this file is not visible! If you don’t don’t have access to computer send me a message and I will figure out the alternative ways to upload necessary information.
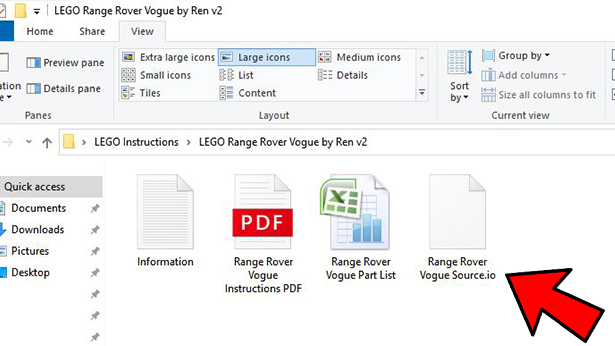
– Once you have your source file you can either drag and drop it on upload screen, or click browse ”Browse for file”
Step 5
– If everything is good You will get green message that your source file was accepted. Click on ”Proceed to verify items” and we are good to continue to next step.
– If you get error message and it shows something like ”Par not found on catalog” and part number – this means there are updates to LEGO part numbers and my source file is out of date. In this case contact me and I will fix the source file (situations like this is my fault, and I will give you another free instructions of your choice as bonus).
– I you get error message with something like ”Null” somewhere – it means Bricklink site is experiencing some issues, and you need to try again later. I actually encounter this error somewhat often.
– As of December 2024 I’m starting to get some reports that this ”NULL” error does not go away for same people and it goes away only on different browser. From what I understand the Chrome browser usually have this problem. If you use Chrome and get this error try switching to Firefox instead (or any other browser).
– If you get this or any other error message longer than few hours or can’t find any resolution, contact me, I will check whats going on from my side.

Step 6
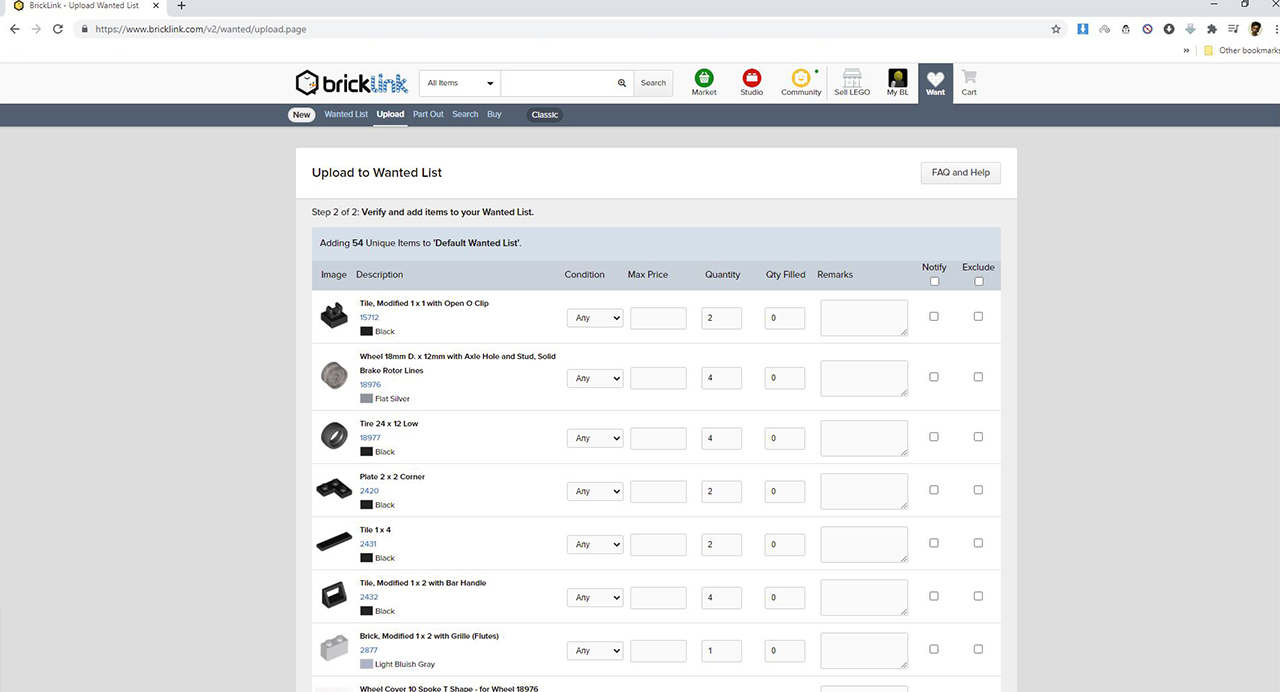
– Now your part list is prepared and you can see all the parts with part numbers, names and preview images. If you only want to see the part list or write down some names or numbers for later use you stop here, no need to go further. Everyone who want to order parts will continue.
– At this point, if you already have some parts on your collection, or plan to buy them elsewhere you can exclude them from the list or change the quantity.
– If you need every part listed – you can go to the next step, no need to change anything else here.
– I recommend to not change part “Condition” section away from “Any” – because almost all my models will include parts from discontinued sets (at any given time LEGO only uses small fraction of their part library/color combination). So these parts from older sets will appear as used.
– My price estimate (that you can find on my models description page) is based with this setting in default configuration (Any).
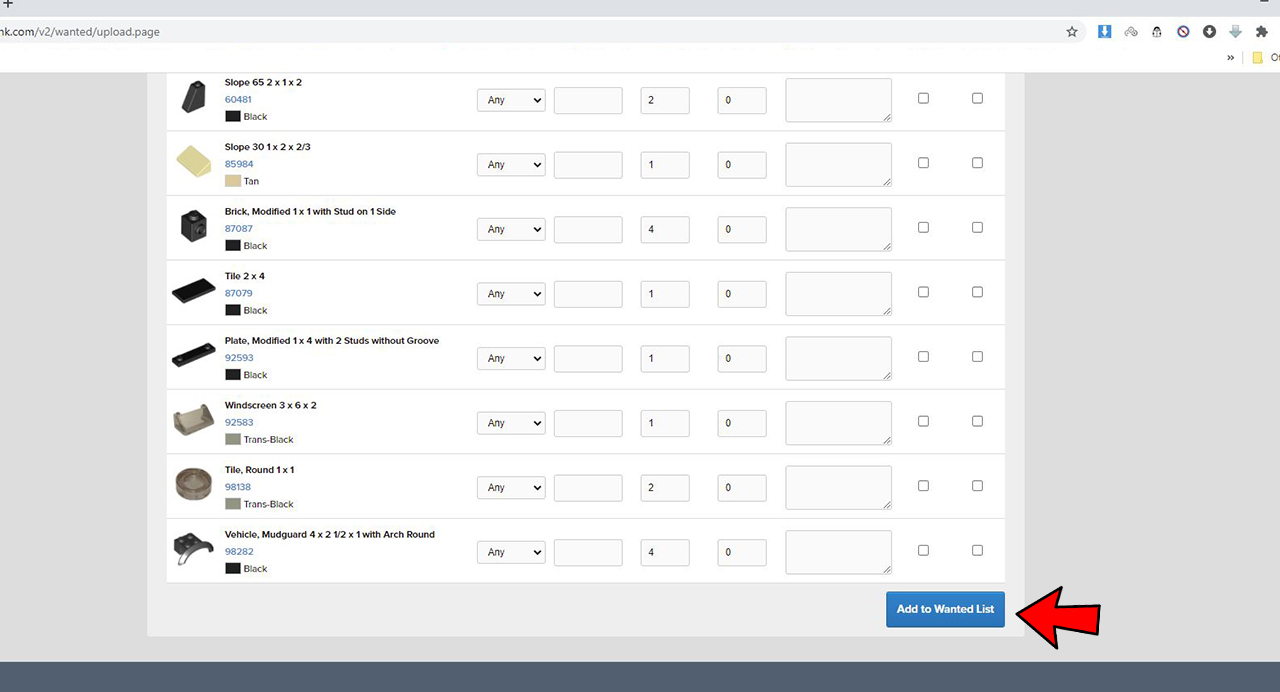
– Scroll down and click on ”Add to Wanted List”
Step 7
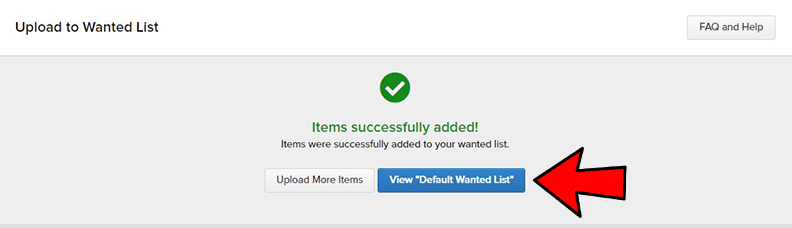
– You will get green message that items are successfully added. At this point all your parts are saved in “Default Wanted List”, and will stay there until you delete them. So if you close your browser or log-off from your Bricklink profile – you can return later and everything will still be there.
– To continue – Click ”View Default Wanted List”
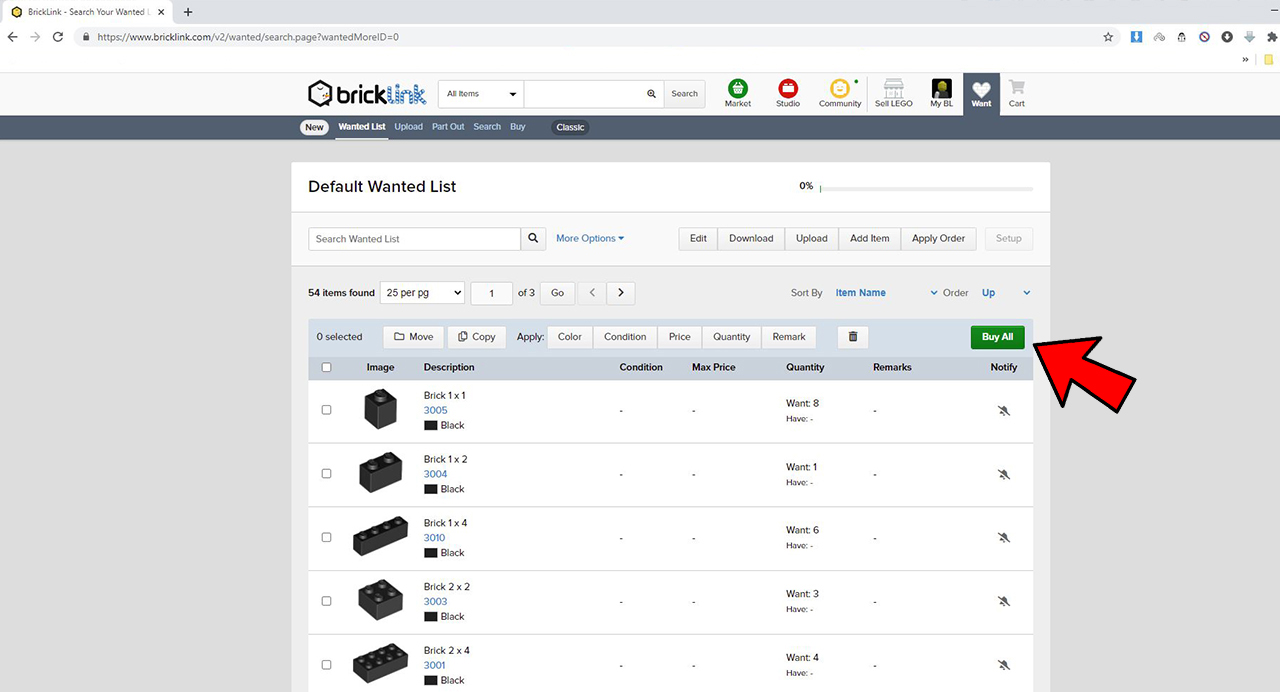
Step 8
– To continue Click “Buy All”
– When you want to delete your Part list (Wanted list) then you need to go back to this step, and select all parts by selecting that top empty square on left side. It will select all parts visible in this page, and you can remove them by clicking delete icon on the top right side. Repeat until all parts are gone.
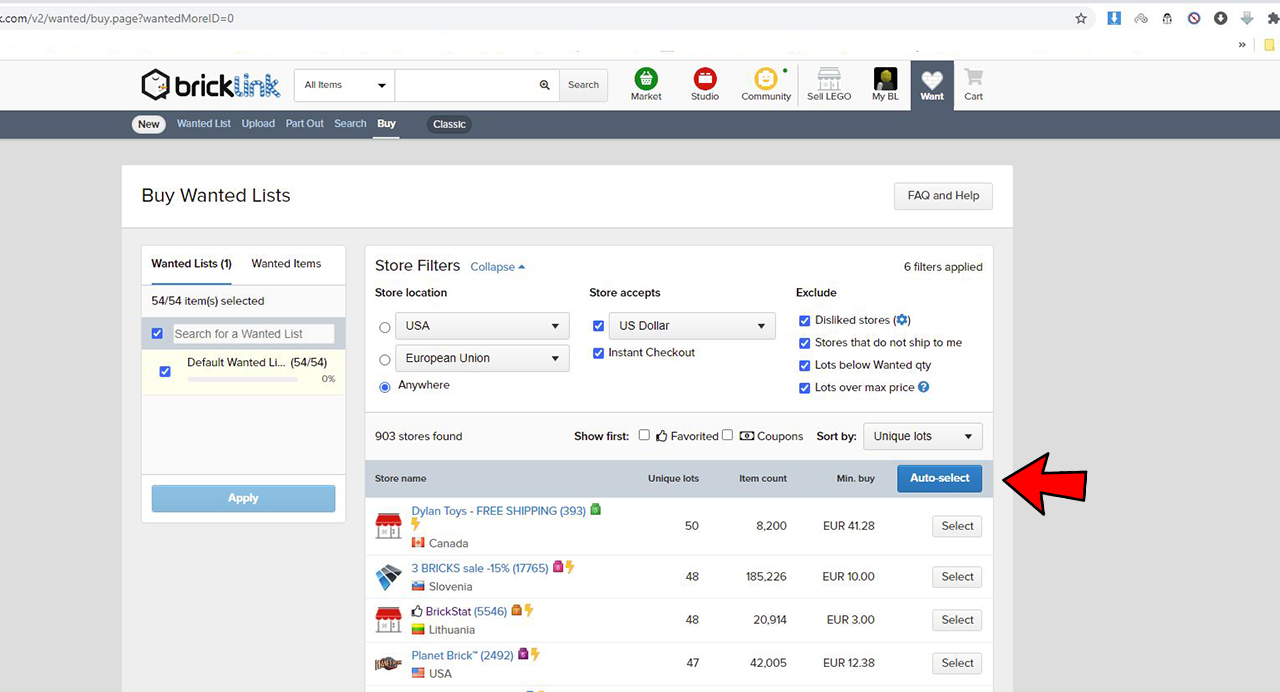
Step 9
Now you can see all stores that have your parts. Let the Bricklink to find the best way to buy them – adjust the store filters and click ”Auto Select”
– What you want is to have the least amount of shops needed because shipping is what will add up really fast with each extra shop. So check the different filters and see how total price changes and how much shops you need. Sometimes it might be cheaper to have few $ more in parts, and have less shops needed. For my City (6 studs wide) scale models it usually require 1 – 3 shops to buy everything.
* Store location – try different options and see which works the best for you. Ideally you want to buy everything near you (or in same continent) to keep the shipping cost down, but if all parts are scattered across many sellers, it might be cheaper to order overseas if in that case you need less stores to buy everything.
* Large stores will always accept either USD or EUR or both. You can try to switch between them to see if you get better results (PayPal will convert your order to correct currency)
* Instant Checkout – if this option is selected Bricklink will only find stores that have automatic checkout (you will see the exact cost + shipping immediately), stores that don’t have this option enabled will send you invoice after ordering (that can be paid on site), but you won’t know the final shipping cost before invoice arrives. I usually order from stores with instant checkout, but if you don’t get good results, its worth to see the results without instant checkout.
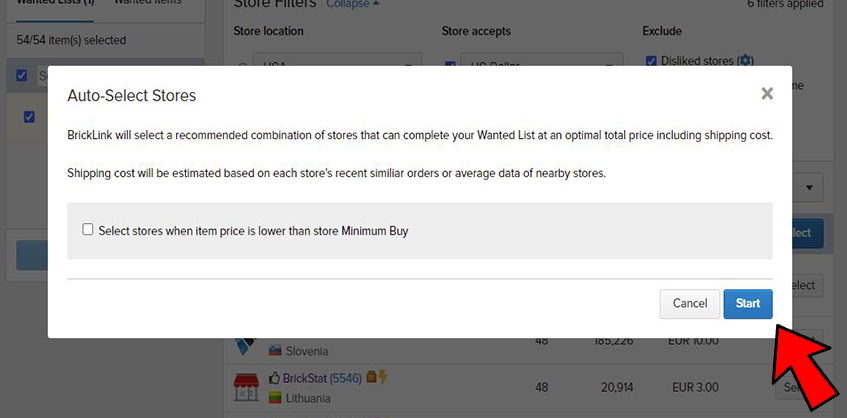
Step 10
A message will pop-up. Read it and continue with ”Start” button. No need to check that Minimum Buy option.
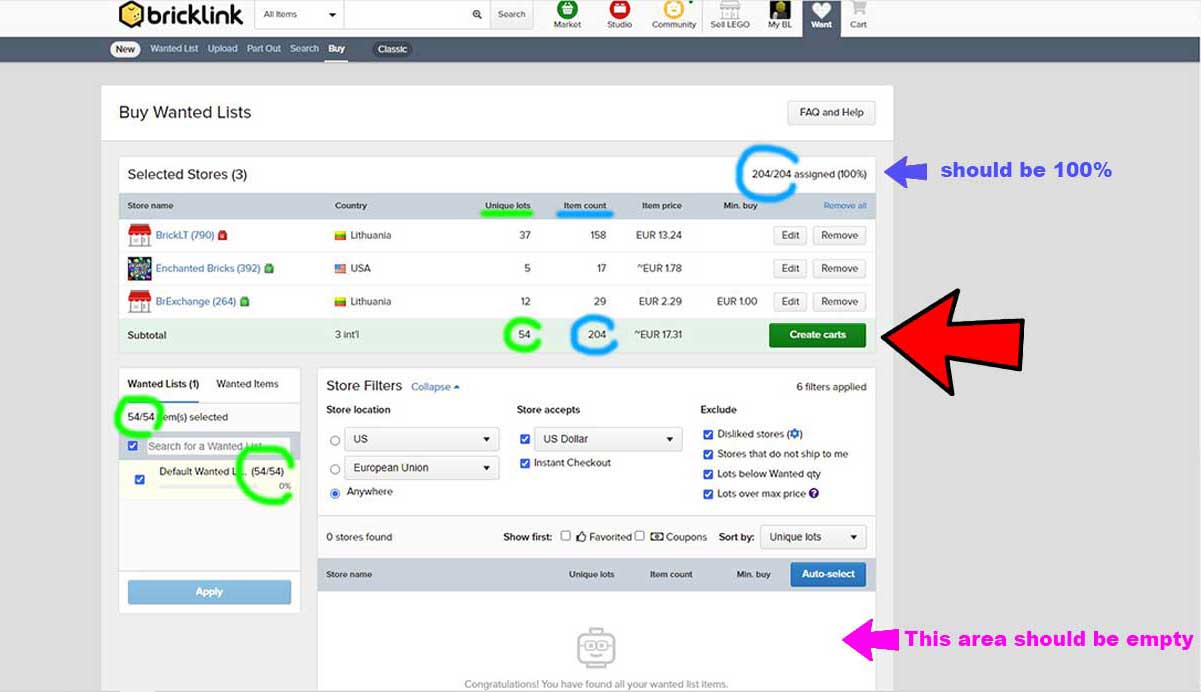
Step 11
– Now you have your stores selected. Check the total item price. And check how many stores you need. As we can see in my example – I need 3 stores, which is OK for City scale model. Remember that total item price is only parts – shipping will show up once you will check out at each individual store (either on automatic checkout, or in invoice). Depending on store and how many parts you need shipping usually cost anywhere between standard envelope cost to around $10 per store.
– If you want to try different options, remove selected store by clicking ”Remove” and then try ”Auto Select” again with different filters.
– Numbers in same color circles should be the same. But you don’t really need to recheck every number – the only number you really need to check is where the top blue arrows points – percentage/assigned number. It should always be 100% or more. If its at least 100% it means you have all your parts selected and you are good to continue.
– If it shows less than 100% (in that case numbers also won’t match) then some parts are not selected (usually because there are no stores to match the filters – mostly if some stores have minimum buy requirement that is not reached). If this happens there should be stores visible at the bottom part of the screen (where the pink arrow points) – then you can check and select these stores manually. Sometimes it might be cheaper to to pay that extra $ if you are really close to stores minimum buy, than to change everything and get different stores that would cost you more in total. You can ask for extra minifigure or something. What’s bad – not all stores have set their minimum buy requirement, and they might inform about that when order is placed.
If you have trouble with this step or you can’t get any reasonable amount of stores or some stores below minimum order amount are messing with your results – contact me and I will help you adjust in this situation.
– If it shows more than 100%, this means that some parts are selected from bulk lots (with already defined quantity), and you will get extra parts. If total price still look OK, you are good to order.
– When everything looks good you click “Create carts” button. After that you can order from each of selected stores.
Now the important part – after your parts arrive – especially If you order parts for someone else as gift – always check that you have every part, because mistakes can happen! I’ve seen missing parts or wrong parts in packages somewhat regularly. Probably a good idea would be to film package opening. And then you can check your parts with my instruction steps.
Everyone who I talked about missing parts says that sellers always fix their mistakes, but it just takes more time for new package to arrive.